An overview of the Assistants application and how to use them
Every automated system still requires some manual labor to set up instruments, perform regular maintenance, or clean up a work cell. To streamline integrating manual steps into your automation and make it easy for users to perform these tasks, we've created Assistants - an interactive and dynamic application that guides users step-by-step through manual work.
This article explains:
What is an Assistant?

Assistants are digital interactive guides that provide step-by-step instructions for all the manual tasks in the lab. They replace paper SOPs used in the lab to help with training or on-the-job guidance.
Typically, one SOP translates into one Assistant, but it is also up to you! For example, if you have multiple SOPs that can be completed in one batch, you can combine them into one large Assistant or keep them separate.
However, if an action or step needs to be taken between SOPs, they would be split into their own Assistants.
When running an Assistant, you will see interactive pages detailing all the steps and tasks required. Alongside the steps, you will also see a Digital Twin of your lab; instruments or labware can be linked to specific steps for easy visual reference. To make it easy to follow and understand the required steps, Assistants can include:
- Callout Boxes that provide warnings or essential notes to prevent errors
- User prompts to capture critical data like lot numbers, plate barcodes
- Timers that help keep track of the time elapsed
- Embedded videos or images that help provide supplemental information on how to perform a task
- Formatted text options that help highlight key details
To leverage these features, the Assistants application includes two tools - a Player and an Editor.
- Assistant Player - how the Assistant is presented to an operator during a running workflow
- Assistant Editor - where you create and edit your Assistants
Types of Assistants
There are two types of Assistants - static and dynamic:
Static Assistants
Static Assistants are Assistants where the instructions and quantities do not change with runs. This may be because the number of samples never varies across runs, or even if the number of samples changes, the instructions, and labware quantities do not.
Common examples of static Assistants are:
- Setup for instruments with only one plate capacity
- Troubleshooting guides
- Routine maintenance of instruments
- Clean up of work cells, instruments, or liquid handlers
Dynamic Assistants
Dynamic Assistants' instructions and quantities change from run to run due to changing conditions like the number of samples.
Common examples of dynamic Assistants are:
- Workcell, instrument, or liquid handler setup
- Guiding users through the manual operation of standalone instruments
- Workcell, instrument, or liquid handler cleanup
Both static and dynamic Assistants are created from the same Editor. Dynamic Assistants will require using "Parameters" in the Editor and the Workflows Application, which will be reviewed below.
Compliance Mode Assistants
Static or dynamic Assistants can also be made into "Compliance Mode" Assistants. Compliance Mode Assistants enforce strict rules for completing the Assistant, including:
- All boxes must be checked
- Steps must be completed in the order they are presented in
- All input fields are required to be completed
- "Mark Complete" is no longer an option for the Assistant
When are Assistants used?
Assistants are used to guide users through any required manual work. These activities include set-up and clean-up, maintenance, troubleshooting, software setup, and more. If a paper SOP exists, it can be easily translated into an Artificial Assistant.
Assistants can be scheduled as a part of a job that includes an automated run, on a recurring schedule, due to a triggering event, or manually on-demand.
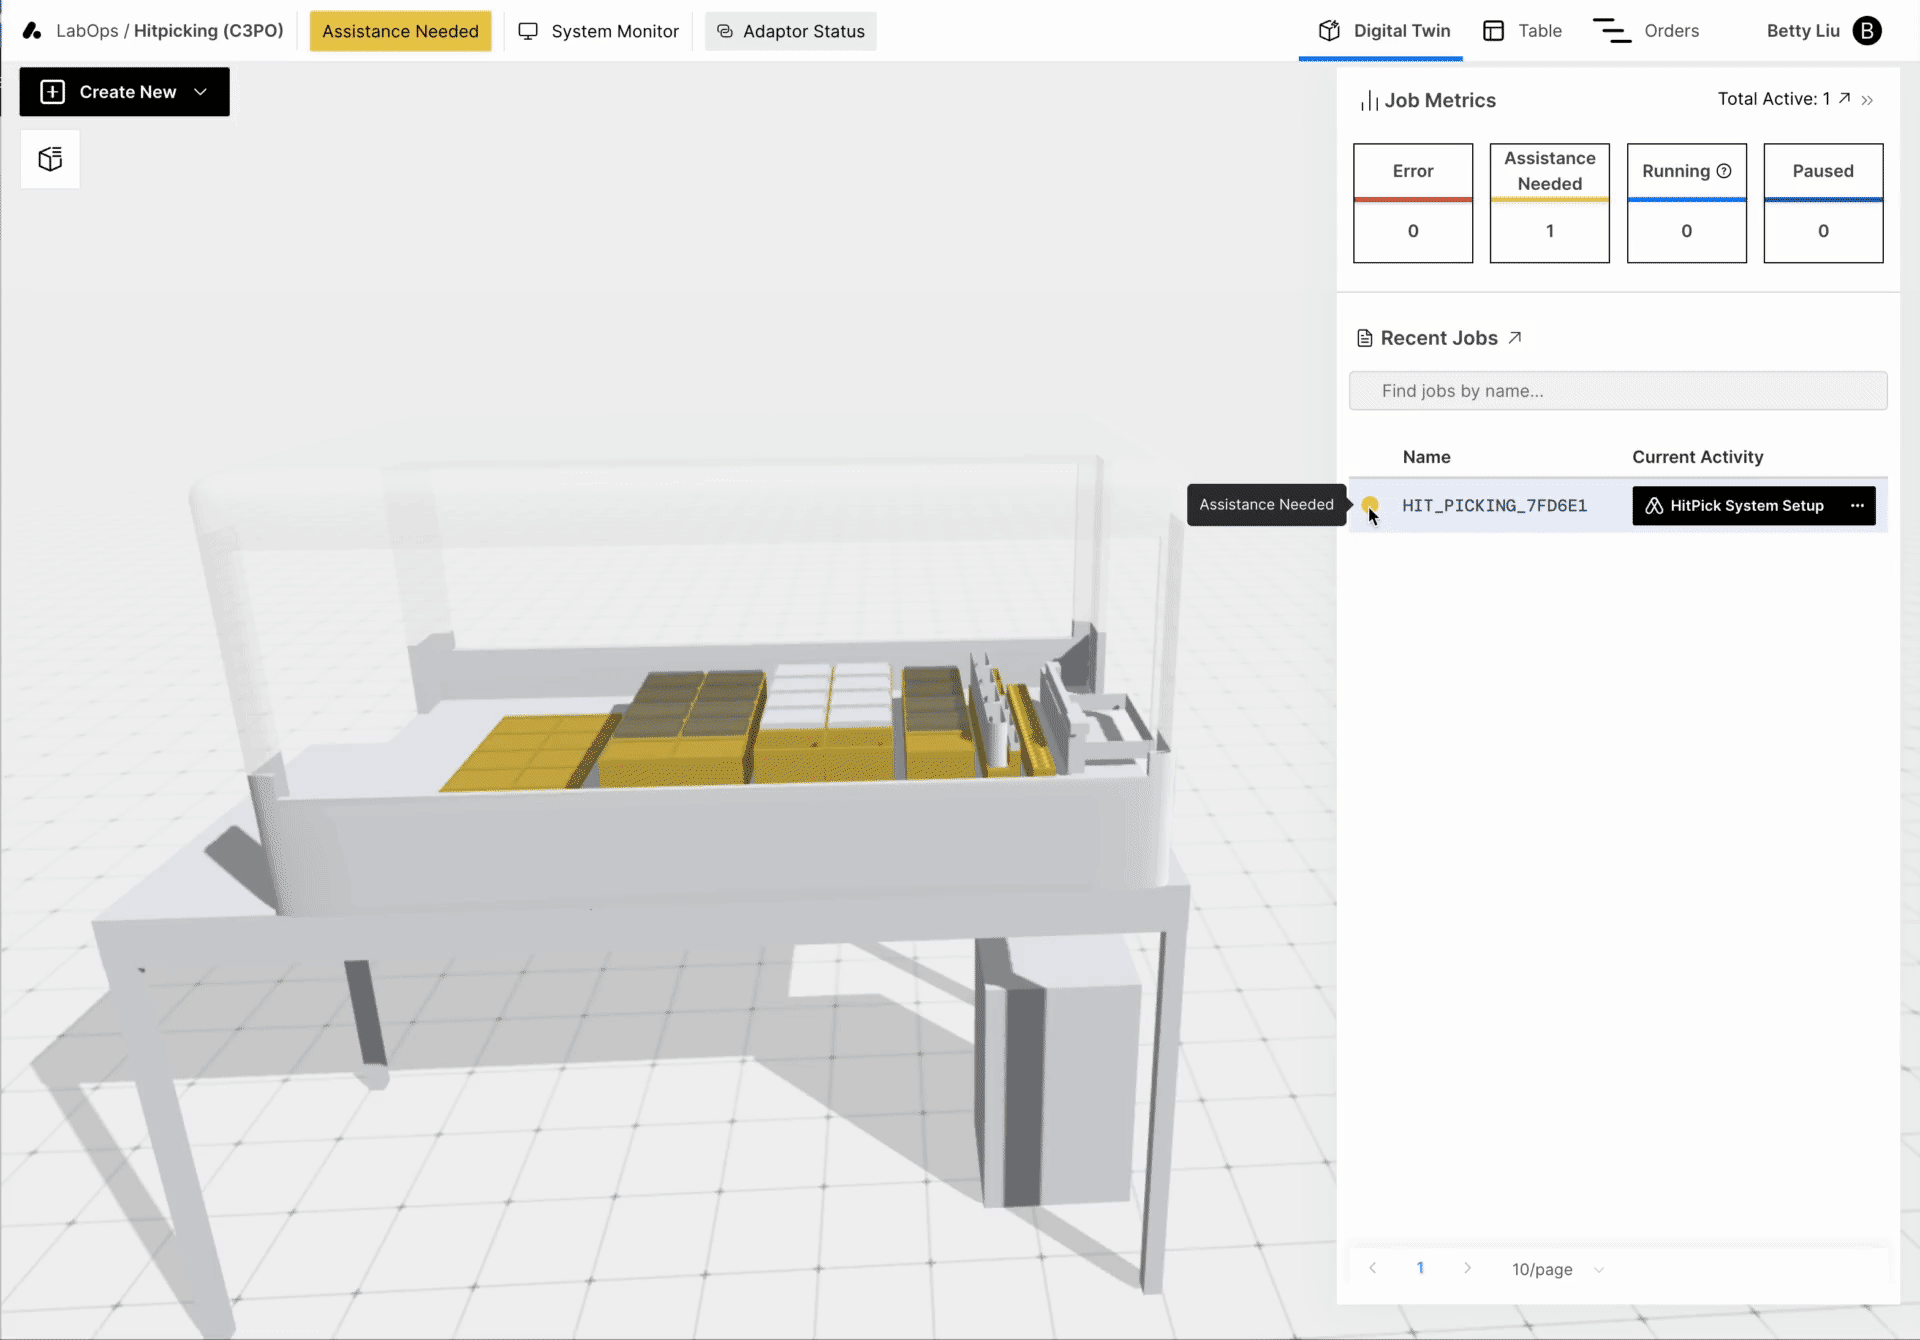
A user will know when to complete an Assistant when a LabOps job's status changes to "Assistance Needed" state with a yellow indication. This is accompanied by a black banner, which is how a user can access the Assistant. Oftentimes, one of the models in the Digital Twin will also have a yellow highlight to show what needs to be tended to.
How to run an Assistant
You can access the Assistant by clicking the black banner with the Assistant's name.
When you click on it, you will be presented with two options:
- Run: This will open the Assistant in a player and take you step by step through all your tasks.
- Mark Complete: This marks the Assistant as complete without opening the Assistant so the job continues to the next step.
- When you select this option, please ensure you have completed all the necessary steps!
The Anatomy of an Assistant
Once you start an Assistant, you will see three sections:
- Steps: An overview of the required steps
- Materials: A list of required materials for the Assistant
- Parameters: A list of parameters used in the Assistant and the values that were passed in

You can start the Assistant by clicking the play button or skip to a particular step by clicking that step's play button! The Assistant will then take you through each step/task that needs to be completed. You can check them off as you complete them.
As you go through the Assistant, you may come across features such as:
- User Prompts - you can capture data like lot numbers and plate barcodes, or ask the users questions that impact the workflow
- Timers - you can start a timer and revisit this page later to see the remaining time
- Call-outs - reminders of critical information
- Images/Videos - you can tap the image/video icon, and it will enlarge the image or video
- Specially formatted text - Grey text with a box icon indicates the text is linked to a model in the Digital Twin. You can zoom into that specific model in the Digital Twin by double-tapping the text.
Once you reach the end of an Assistant, you will have a chance to review whether you've completed all the tasks. If everything looks accurate, you can hit complete, and the job will continue onto the next step!
Next Steps
Before building your first Assistant, it is important to understand the concepts of Materials and Parameters. Then, once you're ready, learn how to create an Assistant here!