Learn how to use the Assistants Editor to create and customize interactive Assistants.
Creating Assistants is simple! To get started, you just type your steps and tasks as you would with a word document. This page will describe how you can add interactive elements and customization to your Assistant including:
- Accessing the Assistant Editor
- Anatomy of an Assistant Editor
- Writing and formatting steps and tasks
- Assistant Step/Task Toolbar
- Adding Camera Angles
- Turning on Compliance Mode
- Previewing your Assistant
Accessing the Assistants Editor
To create a new Assistant:
- Click on Assistants on the left hand applications panel
- Click on +
- Name your Assistant
- Select the Lab to associate the Assistant
- Indicate whether you want the Assistant in "Compliance Mode"
- Press Continue
Currently, you can only assign Assistants to a single Lab. So, if an Assistant applies to multiple Labs, you must create a new Assistant and associate it with the other Lab. You can select all the text and use keyboard shortcuts to copy and paste it!
You are now in the Assistants Editor application.
Anatomy of an Assistant Editor

Upon entering the Editor, you will see the following:
- Editor panel where you create your steps and tasks in the Assistants
- Lab Scene where your Digital Twin is shown
- Please note that you cannot edit the Digital Twin here. This can only be done in the Labs application. Learn how here.
- Materials, Parameters, and Outputs open a table where you define the materials, parameters, and outputs used in your Assistant. Learn more about them here.
- Preview button where you can preview your Assistant in the player form
Editor Panel Features
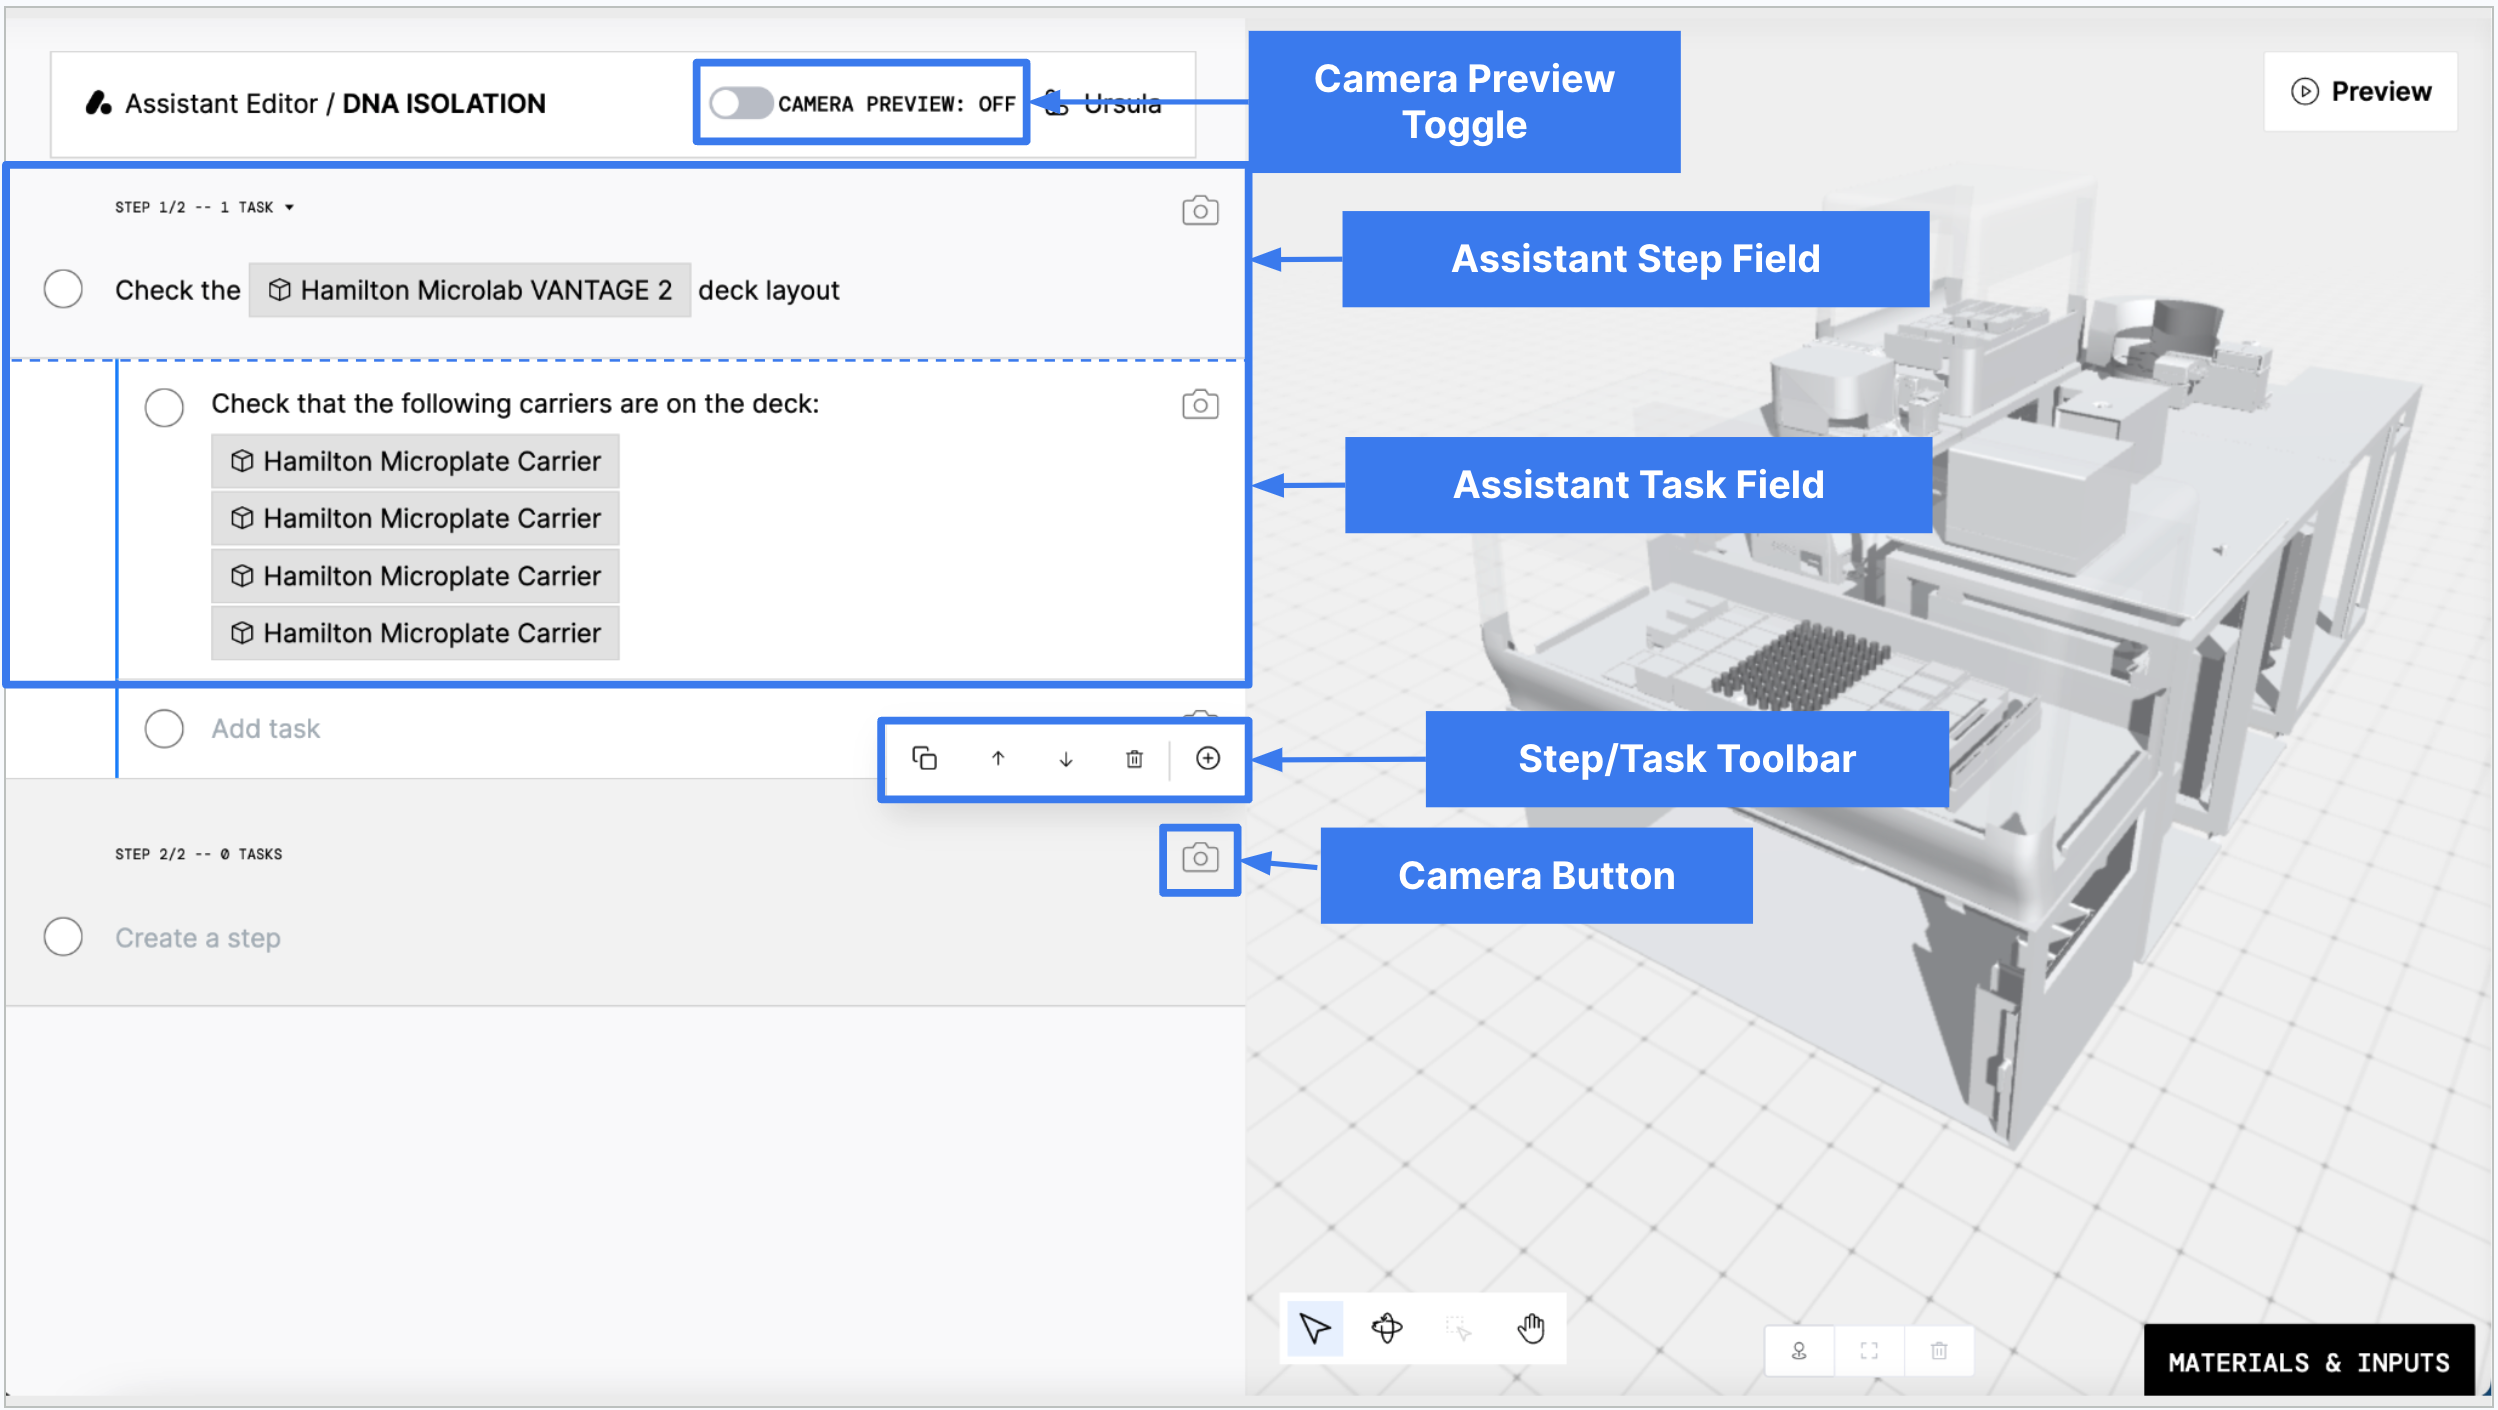
The Editor Panel includes:
- Camera Preview Toggle: This turns the camera preview on and off for each step/task. This is turned off by default.
- Assistant Step Field: Open text field to write the step
- Assistant Task Field: Open text field to write tasks for each step
- Step/Task Toolbar: Toolbar with critical functions such as duplicate, move ordering, delete, and add interactive features
- Camera Button: This sets the camera view for that specific step or task
Writing and formatting steps and tasks 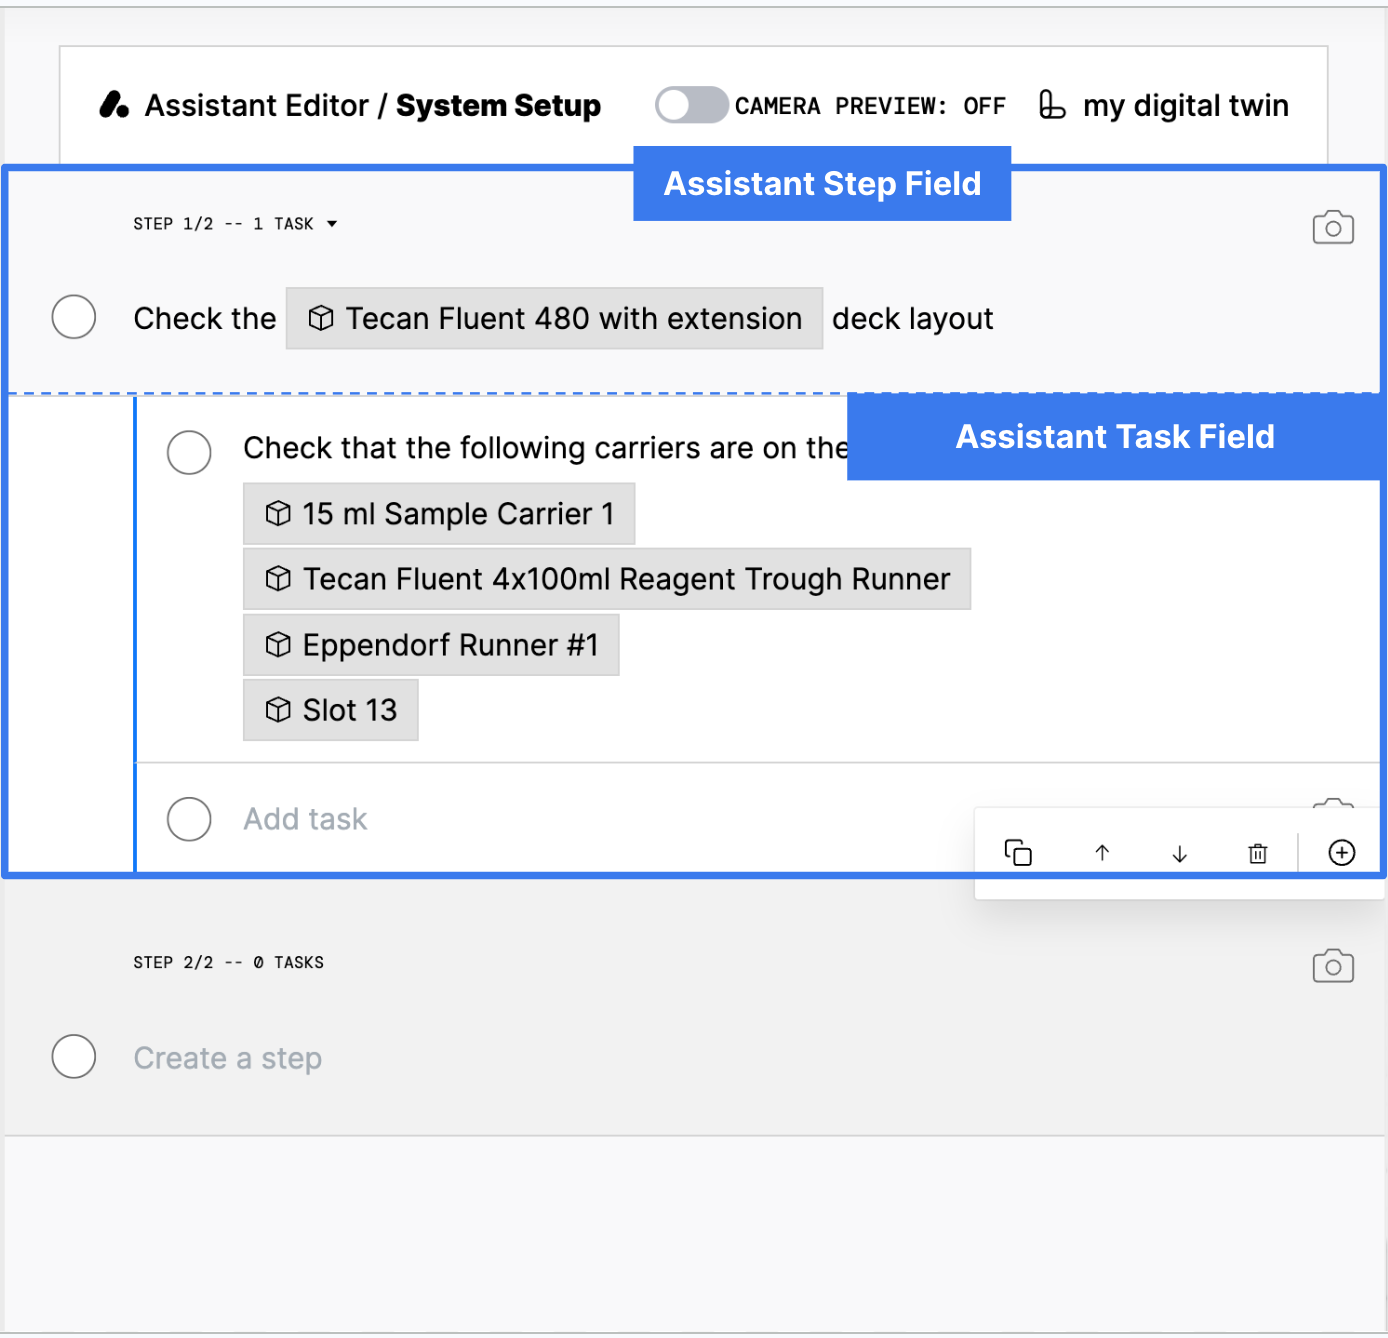
Assistants are organized across pages. Each page has one step, which is the header for the page, and any number of tasks required to complete the step.
Typically, an Assistant Step or Page is by instrument, but it can be organized however you like!How do I reference something in my Digital Twin?

There are three ways to link text in your task/step with a model in the Digital Twin:
- Option 1: Type "/" and start typing the name of the model
- This will pull up a list of assets in the Digital Twin with that name, and you can select your desired item from the list.
- Option 2: Hold "Shift" and mouse-click the model in the Digital Twin
- Option 3: Highlight the text you want to link to the Digital Twin, click the box icon in the formatting toolbar, and click on the model in the Digital Twin.
How do I reference a Material or Parameter?

After you've added your parameters and materials to the table, you can start typing "/" and its name, then select it from the dropdown list.
For more information on creating a material or parameter, visit this page.
How do I format my text?

When you highlight text, a formatting toolbar will appear with options to:
- Bold
- Italicize
- Underline
- Hyperlink
- Color
- Link to a Digital Twin model
You can also use keyboard shortcuts to bold, italicize, and underline text!
Assistant Step/Task Toolbar

The Step/Task Toolbar appears when you have a step/task selected. The toolbar includes functions to help you:
- Duplicate a task or step
- Move the order of a task or step up or down
- Delete a task or step
- Add interactive features
How do I add media like photos and videos?

Supported file formats include: png, jpeg (jpg), gif, mp4, webm
There are a few different ways to add references to photos + videos:
- Copy and paste an image directly into the step/task
- Drag and drop an image/video into the step/task
- Copy/paste or type a URL - it will automatically hyperlink once you hit return
- Upload media:
- Click the + button on the step/task toolbar, select "Upload Media" and select the image/video from your files.
- Add media link (this is for publicly hosted media on GitHub, AWS, or Imgur):
- Click the + button on the step/task toolbar, select "Add Media Link," and copy and paste the image URL.
How do I add callouts?

- Click the + button on the step/task toolbar, select "Add Callout"
- You can also use the keyboard shortcut Ctrl/Cmd + ↑ + c
- Type your message into the yellow box
How do I add user prompts to collect information?
- Click the + button on the step/task toolbar, select "Add User Prompt"
- Select the User Prompt type:
- Text
- Number
- Boolean
- Barcodes
- Equipment
- File
- Label the prompt and associate it with a Material or an Output, if desired.
- If you associate it with an output, ensure the output type and the user prompt type match.
- For files, the type must be string.
- If you associate it with an output, ensure the output type and the user prompt type match.
How do I add a timer?

- Click the + button on the step/task toolbar, select "Add Timer"
- You can also use the keyboard shortcut Ctrl/Cmd + ↑ + 0
- Label the timer, if desired, and indicate the number of minutes and/or seconds
How do I add a conditional?

- Click the + button on the step/task toolbar, select "Add Condition"
- You can also use the keyboard shortcut Ctrl/Cmd + ↑ + i
- Select the corresponding parameter and logic to follow for hiding that specific task
Adding camera angles
Every step and task can have a set camera view to position the user to a specific angle of the Digital Twin.

To set the view:
- Navigate to the desired camera angle in the right-hand Lab View
- Click on the camera icon of the task or step to save
- To update the view, navigate to the new camera angle and click on the camera icon again
To preview the camera views, you can either:
- Toggle on Camera Preview at the top and click on each step and task to see the specific view
- Hit Preview in the top right corner to open the entire Assistant in the Player
Turning on Compliance Mode
Compliance mode enforces strict rules for completing the Assistant, including:
- All boxes must be checked
- Steps must be completed in the order they are presented in
- All input fields are required to be completed
- "Mark Complete" is no longer an option for the Assistant
You can turn compliance mode on by checking the "Compliance Mode" request when you are creating a new Assistant.

For an existing Assistant, go to the Assistants section and click on the Assistant. This will open up a pane. Then, check the box for "Compliance Mode" to turn it on. 
Previewing your Assistant
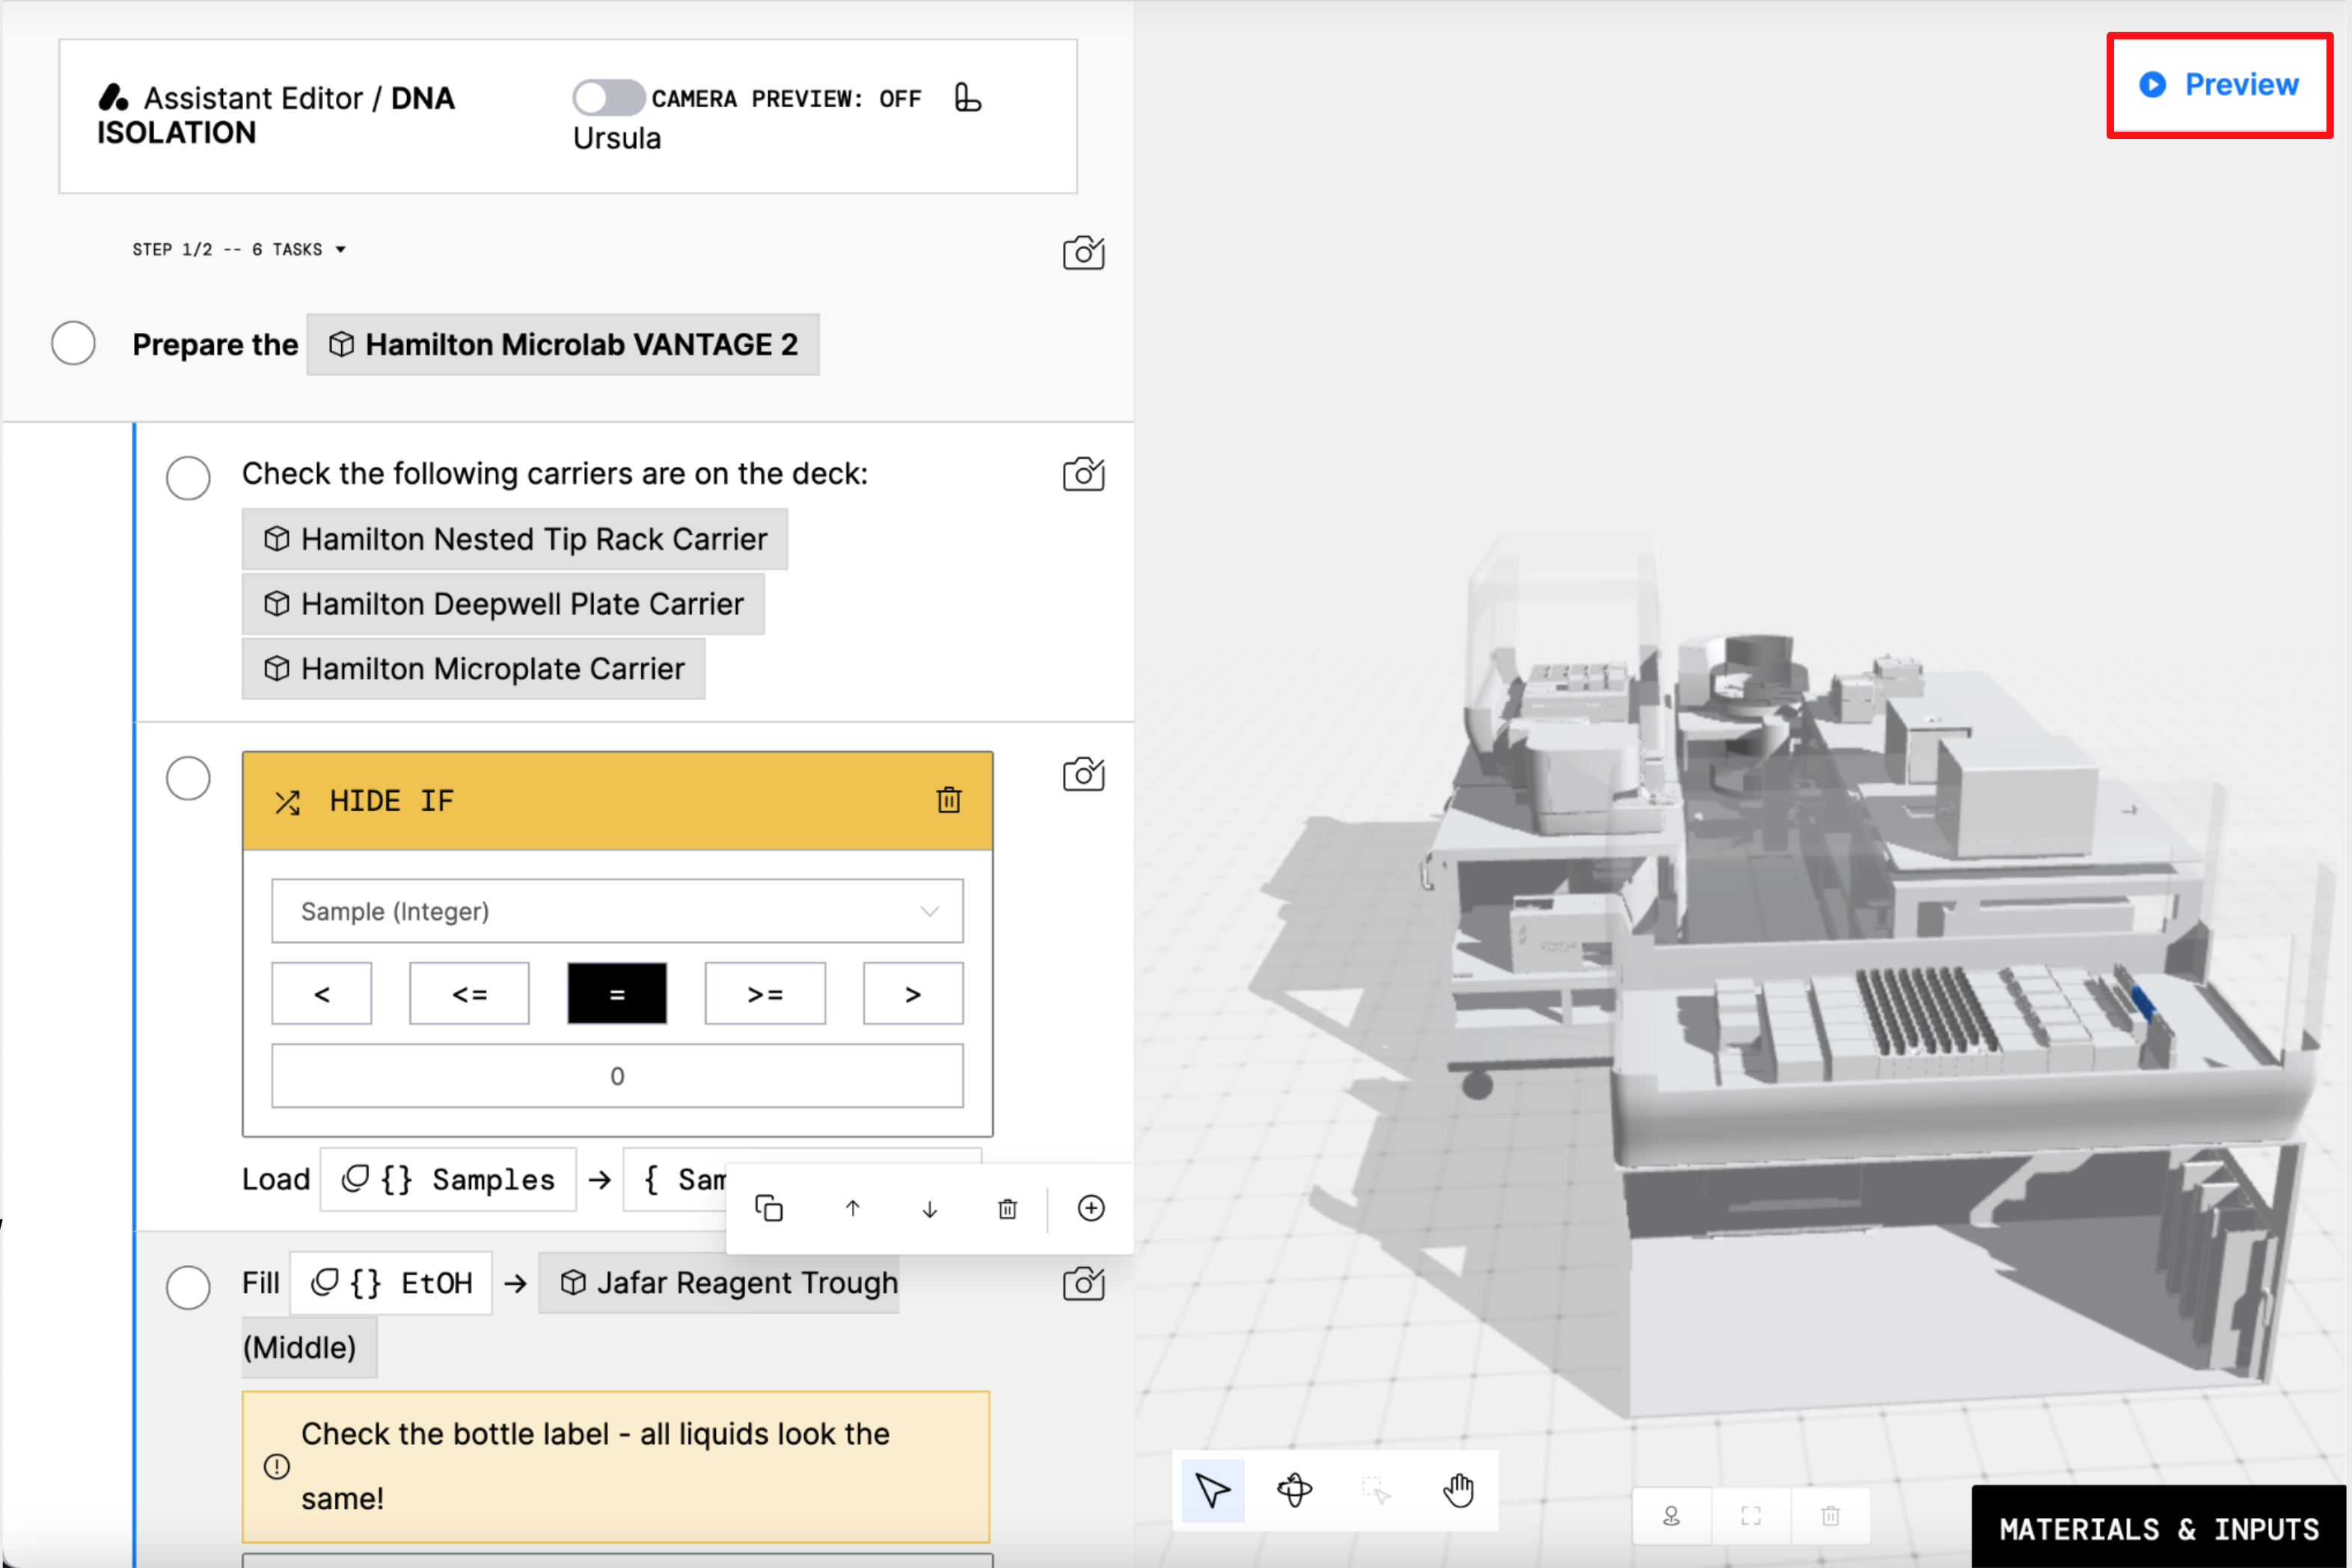
Once you are all done and ready to preview your Assistant in the player, click the "Preview" button in the top right-hand corner.
This preview mode is a simulation of the Assistant. Values dependent upon parameters may not appear since the parameter values still need to be set. These values would be set during a real job. You must connect the Assistant to a Workflow with parameters to see values.
Next Steps
Now that you've created your Assistant, it is time to schedule it! You can learn about the different ways Assistants can be scheduled here.
Or, build your first Assistant with an exercise and tutorial here.